
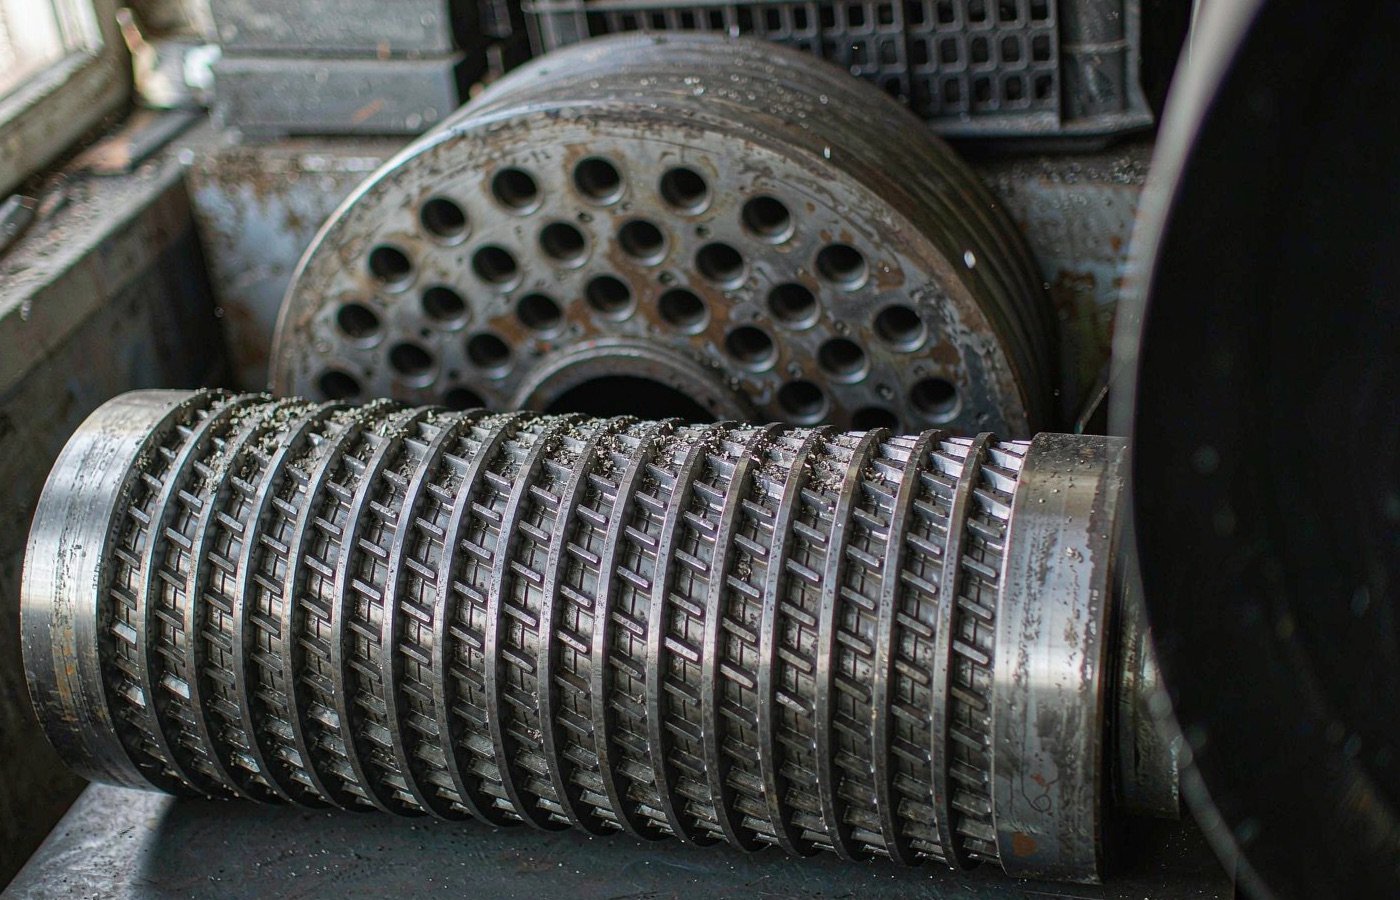
 The ring die gets all the attention when buyers spec a pellet mill. Then the line runs for four months and the part that actually wore out first is the roller shell — the grooved sleeve bolted over each press roller, pressing sawdust into the die at a gap of roughly 0.1–0.3 mm. When the shell wears, the gap opens, material slips instead of compresses, output drops, and the die wears unevenly behind it.
We build vertical ring die mills and we ship Cr26 shells as standard. But the shell you need depends on your feedstock far more than on the mill model. This guide covers what shells are made of, how they fail, what to check before you pay, and when to change them. If you are also speccing dies, read it together with our ring die buying guide — the two parts wear as a pair.
Why the roller shell fails before anything else
The shell works in the worst corner of the machine. It carries the full compaction force, it slides against raw material loaded with grit, and it runs hot because all the friction from the compression zone passes through it. The contact band between shell and die is narrow, so the load per square millimetre is high even when the mill is running well below rated capacity.
A wear trial on a biomass pellet mill in China documented how brutal this duty is. The tested roller assembly was made from 45 steel with a 3 mm carburized layer and lasted just 200 hours before wear failure. Scanning electron microscope work showed the dominant mechanisms were adhesive wear and abrasive wear, plus stress corrosion cracking near the junction of the carburized layer and the substrate. Wear was deepest on the feed side of the roller — up to 4.2 mm, about 1.2 mm deeper than the other sides — because that is where fresh, often grittier material first bites the shell. The researchers blamed silicate minerals, impurities and moisture in the raw material for the rapid failure (Transactions of the Chinese Society of Agricultural Engineering, roller wear failure analysis).
Three practical lessons follow from that study. First, a shell that is merely “hard enough” on paper can fail in months if your feedstock carries sand, bark grit or stone fines. Second, wear concentrates on the feed side, so a shell can be scrap on one band while looking fine elsewhere. Third, cheap shell steel is the most expensive steel you can buy: 200 hours means a shell change every couple of weeks on a two-shift line.
What the shell is made of
Four material families dominate the market. The numbers below come from one Chinese roller supplier’s published comparison (Changsheng, roller shell Cr26 vs tungsten carbide); we have seen the same bands from other vendors and from operators running our mills.
| Shell material | Hardness (HRC) | Typical life, softwood | Typical life, hardwood | Relative cost |
|---|---|---|---|---|
| Cr26 high-chromium iron (standard) | 58–62 | 1,200–1,800 h | 600–1,000 h | 1.0× |
| Tungsten carbide hardfaced | 68–72 (surface) | 1,800–2,500 h | 1,000–1,600 h | 1.8–2.2× |
| Stainless steel 440C | 52–56 | 800–1,200 h | 400–700 h | 1.5–2.0× |
| 45# carbon steel (cheap shells) | 25–35 | 100–300 h | 50–150 h | 0.5× |
Read that table with your feedstock in mind, not just the price column. Cr26 is the right default for softwood, mixed sawdust and clean biomass. Tungsten carbide hardfacing pays for itself when silica rides in with the raw material — rice husk, palm kernel shell, straw, and any hardwood bought from a yard that also handles construction wood. The hardfaced layer is 3–5 mm thick, applied by open-arc welding or spray-and-fuse, and can cover the full face or just the wear zone. On the abrasive feedstocks we estimate a hardfaced shell returns its cost premium in the first change-out cycle, because you buy one shell where you would otherwise buy two.
Stainless 440C deserves a note because it gets ordered for the wrong reason. Its advantage is corrosion resistance — wet, acidic or salty feedstocks, and mills that sit idle in humid climates. On pure abrasion it wears faster than Cr26 while costing half again as much. Buy it for the chemistry of your material, not for the wear figures.
One warning about hardness: harder is not automatically better. A shell at HRC 68+ has less toughness. A piece of tramp metal through the mill, or a hard start against a jammed die, can chip a hardfaced shell where a Cr26 shell would survive with a gouge. And a very hard shell accelerates wear of the die it rides against. The balanced specification for wood pellet work sits in the HRC 58–62 band — which is exactly why Cr26 became the standard.
Do not buy 45# steel shells at any price. Suppliers list them because they exist in the market, not because they work. At HRC 25–35 they polish smooth within days, the grooves disappear, and you are back to the worn-shell photo at the top of this page within a month.
Pairing the shell with the die and your feedstock
Shell and die wear against each other, so spec them together. A hardfaced shell against a soft die will eat the die. A soft shell against a hardened die will eat the shell. The pairing table below combines the die recommendations from our compression ratio guide with supplier roller recommendations (Changsheng die and roller selection tables):
| Feedstock | Die material & hardness | Die L/D | Roller shell | Expected die life |
|---|---|---|---|---|
| Softwood sawdust | GCr15, HRC 52–56 | 1:4–1:6 | Cr26 | 1,800–2,500 h |
| Hardwood / rice husk | 20CrMnTi, HRC 56–60 | 1:6–1:8 | Tungsten carbide | 1,200–1,800 h |
| Poultry feed | GCr15, HRC 50–54 | 1:10–1:14 | Cr26 or stainless | 1,500–2,500 h |
| Cattle feed | GCr15, HRC 50–54 | 1:8–1:12 | Cr26 | 1,500–2,500 h |
Notice what the table implies for fuel pellet producers. On clean softwood, a Cr26 shell and a GCr15 die at 1:4–1:6 is the economical pairing, and both parts reach the 2,000-hour neighbourhood. On rice husk or PKS, you move to a harder die and a hardfaced shell and accept shorter life on both — that is the price of silica, and no vendor will wave it away for you. Any supplier quoting identical wear life regardless of feedstock is quoting a brochure, not a mill floor.
The general pelleting physics behind these pairings — friction heat in the compression zone, the role of binder softening, the energy cost per tonne — are covered well in the Biomass Connect pelletisation guide if you want the background.
Fit: dimensions to confirm before you pay
Wrong-size shells are a recurring order-line for die suppliers, and every wrong size is a stalled line. Before you order, write down and confirm with the vendor:
- Outer diameter: 150–350 mm across common ring die sizes, matched to your die diameter.
- Shell width: typically 40–80 mm — it must sit inside your die’s working band.
- Bearing bore: 60–120 mm, matching your roller assembly, since the shell presses over the bearing housing.
- Weight: 5–25 kg per shell depending on size.
The reliable way to get this right is to send the vendor your mill model plus a photo of the roller assembly with a tape measure in frame. For our mills we publish the shell dimensions against each model, and the same discipline applies to any brand: dimensions first, material second, price last. When a set arrives, measure the outside diameter against the drawing before it leaves your store — a shell that is a half-millimetre over size will run eccentric, hammer the die, and flatten its own grooves within weeks. Ask the vendor for the finish-grinding tolerance too; ±0.05 mm on the OD is a reasonable commercial standard.

How shells actually fail on the line
Flat wear is the failure everyone expects. In practice, three failure modes end a shell’s life:
1. Grit-driven abrasive wear. Sand and stone fines ride in with the raw material. This is the mechanism behind the 200-hour failure in the CSAE trial, and it is why the front side of the shell wears deepest. The fix is upstream, not at the mill: stone traps, magnets and a hammer mill screen that keeps contaminants out. If your sawdust comes from a port yard or a mixed wood yard, assume grit and spec hardfacing from day one.
2. Bearing seizure inside the roller. The shell stops turning, locks against the die, and gouges a ring into it within seconds. The root cause is dust past the seals and dry grease. Suppliers counter this with triple-labyrinth seals, an air purge at about 0.2 bar to keep dust out, and grease every 8 hours of running. If your mill has manual greasing, put it on the shift checklist — a missed round costs a shell and usually a die.
3. Heat damage. A shell that starts cold against a full die, or that gets hit with water to “cool” it, cracks through the hardened surface. Run the mill empty for about five minutes to warm the die and rollers before loading, and never water-quench a hot shell.
Separate from these, there is the slow erosion you cannot stop but can measure: grooves flattening, the effective gap drifting wider, and output creeping down at the same motor load. That brings us to energy.
The energy you waste with a tired shell
A worn shell does not just slow the line — it charges you for the privilege. Friction between the roller shell and the die surface consumes drive energy even where there are no open die channels under the roller, and researchers at Beijing Forestry University built an experimental mill specifically to recover that loss. Their improved design pressed material into the open channels with rams and ran with no measurable wear on either the roller surface or the die, while pellet density and mechanical durability stayed the same (BioResources, Chen et al. 2015). The commercial message is blunt: the roller-die interface is one of the biggest friction losses in the machine, and a polished, worn shell maximizes it.
Specific energy for pelleting varies widely with feedstock and conditions — the INL’s published trials span roughly 75–275 kWh/t — but whatever your baseline is, a worn shell pushes it up. Watch kWh per tonne alongside output. When energy per tonne climbs while output falls, the compression zone has changed, and the shell is the usual suspect.
What shells cost and how they are made
Knowing how a shell is built tells you which quality checks matter. The manufacturing chain for a Cr26 shell runs: melt the alloy in an induction furnace, cast it — centrifugal casting gives a denser, cleaner shell than static casting — rough-machine the outside to about 2 mm oversize, quench at 980–1,050°C and temper at 200–250°C to hit HRC 58–62 through the section, then finish-grind the OD to final dimension (steps published by one Chinese roller supplier, Changsheng roller shell process notes). For hardfaced shells, the tungsten carbide layer goes on after heat treatment, by open-arc welding or spray-and-fuse, before the final grind.
Every step in that chain is a checkpoint you can ask about. A vendor who cannot say which casting method they use, or who offers a hardness certificate only “on request”, is telling you where their process is thin. Two certificates are worth the money on every order: surface hardness (a spot check on the actual shell, not the batch record) and, for hardfaced shells, layer thickness verification at three points across the face.
On price, supplier lists differ enough that you should always quote against your own die diameter and feedstock rather than trust a web figure. One supplier’s published baseline puts Cr26 shells at $200–800 per set depending on size, with tungsten carbide hardfacing at 1.8–2.2× that baseline; another lists Cr26 at $500–1,200 per set (Changsheng die and roller tables). The honest reading of those ranges: small shells for 350-class mills sit at the low end, large shells for 850-class mills sit above it, and the premium bands are consistent even where the absolutes are not. If a quote lands far below the band, it is usually the 45# steel shell wearing a disguise — ask for the hardness certificate before you ask for the discount.
Run-in and the first 100 hours
Most premature shell failures happen in the first days, not the first thousand hours, and they happen to shells that were installed carelessly. The run-in routine we give our own customers:
- Warm the mill before loading. Run the mill empty for about five minutes so the die and shells reach working temperature together. A cold start presses cold steel against cold die, and the differential contraction is what cracks hardfacing.
- Never quench a hot shell. Water on hot hardened steel is a crack generator. Let it cool in air.
- Set the gap deliberately. Adjust the roller-die gap to the 0.1–0.3 mm working band at every shell change, checked at several rotation positions, not once at one position.
- Grease on schedule. Eight hours between grease rounds, high-temperature grease, and confirm the labyrinth seals and air purge (around 0.2 bar) are actually connected before first start. The bearing inside the shell dies quietly from dust and dry grease — the shell is just what stops turning when it does.
- First inspection at 100 hours. Photograph the groove face and note output and kWh/t. This baseline photo is what you compare against at 300 and 600 hours, and it is the evidence you need if a warranty claim ever comes.
That last point matters more than it looks. Wear on a shell is a curve, and the 100-hour photo tells you whether your line is on the flat part of the curve (normal bedding-in) or already on the steep part (grit in the feed, gap too tight, or moisture fighting you). Operators who photograph every new set catch feedstock problems weeks before the output chart does.
What to put in the RFQ
Shell RFQs fail on vague wording, so put numbers in the table:
- Material and hardness: e.g. Cr26, HRC 58–62 with certificate, or WC hardfacing, HRC 68–72 surface, layer 3–5 mm.
- Dimensions: OD, width, bearing bore, each with tolerance; OD ground to ±0.05 mm.
- Groove pattern suited to the named feedstock — state the feedstock, not just “biomass”.
- Sealing: triple-labyrinth seals and grease interval specification for the roller assembly.
- Hardness certificate and, for hardfaced shells, layer thickness verification.
Store two spare sets from commissioning day and rotate them — our spare parts stocking guide explains the full list and the budget lines that go with it. A shell is a consumable; treat it like one and it never surprises you. Budget its replacement the way you budget die changes: as hours on the machine, not as a calendar month.
Change-out calendar by feedstock
The last thing most buyers need is a rhythm to plan around. These bands assume clean, correctly sized feed and the pairings in the table above. If your line runs 6,000 hours a year, the calendar below is what a maintenance plan looks like in practice:
| Feedstock | Expected shell life | Shells per year at 6,000 h | Inspection rhythm | Stock on the shelf |
|---|---|---|---|---|
| Clean softwood | 1,200–1,800 h | 3–5 sets | Measure groove depth every 200 h | 2 sets |
| Mixed wood / hardwood | 600–1,000 h | 6–10 sets | Every 150 h; watch the feed side band | 2–3 sets |
| Rice husk / PKS / straw | 400–700 h (Cr26) / up to ~1,600 h hardfaced | 4–15 sets | Every 100 h; log output and kWh/t | 3 sets |
Two closing notes. First, replace shells as a set — one worn shell running beside fresh ones loads the die unevenly and shortens everyone’s life. Second, log every change-out: hours run, feedstock, output trend, and the wear pattern you saw. After two cycles you will know your own life bands, and your supplier quote rounds get sharper every time.
If your feedstock changes — a new yard, a new species mix, a switch from sawdust to crushed chip fines — re-run the change-out math before you assume the old bands still hold. Shell life tracks feedstock abrasiveness more tightly than any other variable, and a feedstock switch resets the curve. The cheapest possible insurance is one early inspection on the new material: pull the roller cover, photograph the grooves at 100 hours, and adjust your calendar from what you see rather than from what the last feedstock taught you. Buyers who run this discipline treat wear parts as a cost they manage; buyers who skip it treat them as a surprise they absorb. Over a year, the difference shows up on the cost-per-tonne sheet, not just in the maintenance diary.