
The ring die is the part that turns your sawdust into a product. Everything else on the line — the dryer, the hammer mill, the cooler — prepares material or handles finished pellets. The die is where pellets actually happen. It is also the highest-wear, highest-replacement-cost component in the mill, and when you order the wrong one, you usually cannot return it.
Yet most buyers treat the die as an afterthought. They spend weeks comparing pellet mills, then order a spare die with a one-line message: “8mm die for YPM850.” That message leaves out the steel grade, the hardness, the effective thickness, the open area, the relief design — five decisions that together decide whether the die lasts 500 hours or 2,000, and whether your pellets hold ENplus A1 durability or crumble in the bag.
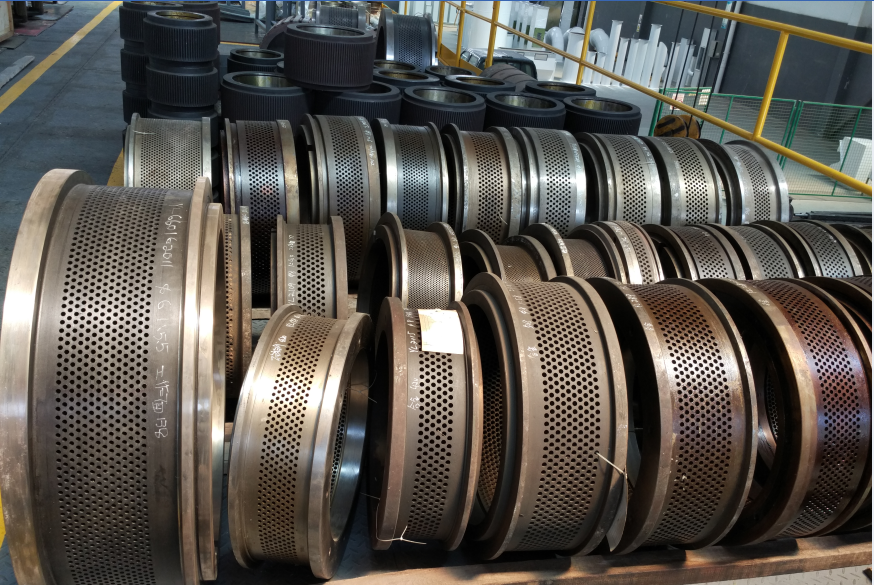
This guide walks through a pellet mill ring die the way a procurement engineer should: what the steel certificate should say, which four dimensions matter most, what realistic die life looks like by feedstock, what a replacement die costs, and the acceptance checks to run before the die ever touches the mill.
Why the die deserves a written spec, not a phone call
Die suppliers are used to taking orders by phone. Many of them will happily make whatever you ask for, exactly as you asked. That is the problem: the burden of getting the specification right falls entirely on the buyer. A die supplier’s order form typically asks for die diameter and width, hole specifications, compression ratio, die material, and relief design — and for larger feed-mill dies the purchase can run between $5,000 and $15,000 depending on size and alloy, a decision that cannot usually be undone (HC Pellet, die selection guide).
For a 2-5 t/h biomass line the amounts are smaller, but the logic is identical. The die is a consumable, so the decision repeats every few hundred to every few thousand hours. A die that wears out twice as fast is not a bargain; it doubles your spare-parts consumption, your downtime, and your labor. The goal of this guide is to make your next die order a written, checkable specification.
One more reason to be strict: pellet quality and throughput are both decided at the die face. Selecting a die is always a trade between compression (higher L/D gives harder, more durable pellets) and throughput (higher L/D means more resistance, more power draw, less tons per hour). As the feed industry puts it, the manager’s task is to pick the highest compression die that still gives adequate throughput — which is why the specification, not the price, is the real decision (HC Pellet).
Steel grades and hardness: what the certificate should say
Two steel families dominate ring die manufacturing, and they behave differently. Knowing the difference keeps you from paying stainless prices for alloy performance, or worse, running an alloy die in a corrosive application.
X46Cr13 stainless steel is the standard grade for biomass and feed dies. Supplier specifications cluster around a hardness of HRC 52-56 after vacuum quenching, with good corrosion resistance — useful when material moisture swings or when the plant idles for weeks (Tianyou Machinery). Machining quality matters as much as the alloy: a well-made X46Cr13 die has hole surface roughness around 0.4-0.8 μm and hole size error within ±0.04 mm, which reduces friction in the bore and helps pellets release cleanly (JIUHE Machinery).
20CrMnTi alloy steel is the higher-hardness option. Case hardness runs HRC 55-62 with tensile strength around 1,080 MPa or more, giving better impact strength and wear life on abrasive wood fibers (Tianyou). One die-maker’s published data shows a 20CrMnTi ring die outlasting a GCr15 ring die by roughly 20-30% across softwood, hardwood and rice husk applications — for example 1,800-2,500 hours vs 1,500-2,000 hours on clean softwood (Changsheng Machinery). The trade-off: alloy dies have a rougher bore finish (around 1.6-3.2 μm in the same comparison above) and less corrosion resistance.
| Property | X46Cr13 stainless | 20CrMnTi alloy |
|---|---|---|
| Hardness | HRC 52-56 | HRC 55-62 (case) |
| Hole surface roughness | 0.4-0.8 μm | 1.6-3.2 μm |
| Hole size error | ±0.04 mm | ±0.04 mm |
| Corrosion resistance | Good — tolerates wet storage and humid plants | Limited — needs oil-filled storage |
| Best fit | Clean sawdust, EN A1 quality targets, mixed feedstocks | Abrasive hardwood, rice husk blends, high-throughput lines |
Hardness and finish figures from published supplier specifications (Tianyou, JIUHE, Changsheng), 2026.
What should you ask the supplier for? A heat-treatment certificate stating the steel grade and the achieved hardness, plus the process (vacuum quenching is the phrase to look for). A die that arrives with no hardness certificate is a die whose real quality you are gambling on. Substandard 45# carbon steel looks identical on the dock and can cost half the life (Changsheng).
The four numbers that decide performance
1. Hole diameter
This one is simple: the hole diameter is the pellet diameter. ENplus and ISO 17225-2 fuel pellets are 6 mm or 8 mm nominal diameter with tolerance bands defined in the standard — Canada’s adoption of ISO 17225-2, for example, publishes the full Table 1 limits including diameter and length tolerances (CAN/CSA-ISO 17225-2 Table 1), and each diameter has consequences for open area, throughput and boiler compatibility — we treat that choice separately in our 6mm vs 8mm comparison. What matters here is that the diameter you pick shapes every other die dimension, so decide it before you talk to die suppliers, not after.
2. Effective thickness and L/D ratio
The effective thickness is the length of the compression channel — the cylindrical section of the hole, not counting the counterbore or relief. Divided by hole diameter, it gives the compression ratio, usually written L/D. A wood-biomass die typically runs an L/D of 5:1 to 8:1, with drier or harder materials pushed above 9:1 (Weike machinery notes). The worked example from the feed industry makes the arithmetic concrete: a die with 4.4 mm holes and 45 mm of effective thickness has an L:D of about 10.2, and each increase in L/D raises pellet durability — at the cost of throughput and power (HC Pellet).
The reason higher L/D helps quality is physics, not marketing: the longer the channel, the longer the material stays under compression, the more work goes into the bond. The reason it cannot be pushed indefinitely is the same physics — resistance rises, rollers start to slip, and throughput falls. Our article on reading the compression ratio spec goes deeper into how different suppliers measure the same number differently, which is exactly why the effective thickness must be written on the purchase order in millimeters, not as a ratio alone.
3. Open area
Open area is the share of the die surface occupied by holes. For biomass applications it typically ranges from 20% to 35% depending on hole diameter, wall thickness between holes and die diameter (Weike). More open area means more output per revolution; too much means thin webs between holes and a die that can crack along a hole row under heavy pressing.
Published supplier tables put biomass dies at a 36-46% opening rate for 6-8 mm holes with compression ratios of 6-8 — higher than the general biomass band quoted above, which shows that different makers optimize differently for die thickness and application (JIUHE). The practical takeaway: ask the supplier to state the open area percentage for your specific hole pattern, and compare it with the die currently on your mill. A large jump in open area on a thick die should be explained, not accepted.
4. Counterbore and relief
The counterbore is the widened entry section that funnels material into the compression channel. It reduces entry resistance, but it has a failure mode buyers rarely hear about: when rolls are overtightened to the point of running metal on metal, the counterbore gets rolled over and blocks material flow into the hole (HC Pellet). Relief design also varies — some dies apply relief equally across all holes, others give more relief to the outer rows, where material otherwise tends to squeeze sideways back into the pressing chamber instead of going through the hole. Operators who skip inspecting the outside rows can lose significant throughput without any alarm sounding (HC Pellet).
Compression ratio and expected die life, by feedstock
Die life is where marketing meets reality. Supplier data compiled from commissioning records and field studies shows a wide but consistent pattern: softwood is gentle on dies, agricultural residue with soil and silica is brutal, and hardwood sits in between. The table below is one supplier’s published ranges — treat every number as a band, not a promise (Kingwood).
| Feedstock | Recommended compression ratio | Typical die life |
|---|---|---|
| Clean softwood (pine, spruce) | 1:6 – 1:8 | 1,200 – 2,000+ hours |
| Hardwood (oak, eucalyptus) | 1:5 – 1:7 | 800 – 1,400 hours |
| Agricultural residue (straw, husk) | 1:4 – 1:6 | 500 – 1,000 hours |
| Mixed industrial waste wood | 1:5 – 1:7 | 700 – 1,300 hours |
Ranges published by Kingwood, based on operator-reported data and IEA Bioenergy field studies.
Another supplier’s table agrees on the pattern and adds the alloy dimension: a GCr15 ring die on softwood 1,500-2,000 hours vs 800-1,200 on hardwood and 400-600 on rice husk; the same die in 20CrMnTi stretches to 1,800-2,500 / 1,200-1,800 / 800-1,500 hours respectively (Changsheng). And one manufacturer states a floor for its biomass dies of no less than 300 working hours (JIUHE) — a useful red flag when a seller promises 3,000 hours on rice husk.
Three mechanisms explain most of the spread:
Abrasiveness. Rice husk ash is 90-95% silica by weight, and silica-rich feedstocks measurably shorten bore life even at 20-30% blending ratios with wood (Kingwood). Sand-contaminated residue behaves the same way. If your raw material comes from ground collection rather than a sawmill, your die life expectation should sit at the bottom of the band.
Moisture variability. Feedstock moisture above 15% pushes steam pressure buildup inside the die channels and causes pressure surges that fatigue the die material (Kingwood). This is one more reason dryer discipline — keeping material in the 10-15% window described in the Biomass Connect pelletisation guide — shows up in your wear-parts budget, not just your quality reports.
Running temperature. Sustained die temperatures above 120°C accelerate hardness loss in the surface layer — the die effectively softens the wear surface that is supposed to resist abrasion (Kingwood). An over-specified compression ratio is a common cause: too long a channel for the material generates excess friction heat. Pellet quality itself depends on this same temperature zone — the binding studies collected in Karlstad University’s full-scale pellet press trials show lignin only flows and forms solid bridges once the material is hot enough, so the goal is a die running hot enough to bind, not hot enough to anneal itself.
What a replacement die costs
For larger feed-mill dies, published guidance puts the decision at $5,000-15,000 depending on size and material (HC Pellet). Biomass dies for 2-5 t/h machines sit well below that, and every supplier prices differently by alloy, hole count and thickness — which is exactly why we will not quote a number here. What we will say: collect quotes that specify the same steel grade, same effective thickness and same open area, then compare. A quote 30% cheaper without a hardness certificate is not the same product.
The smarter cost framing is cost per ton of pellets, not cost per die. On softwood at 1,500 hours versus rice husk at 500, the same die investment is spread over three times the tonnage. Feedstock choice, moisture discipline and roller gap all write themselves into that number before the steel quality even enters the calculation.
Acceptance checks before the die goes on the mill
A new die should pass a short inspection before installation. None of this needs a laboratory; a hardness tester borrowed from a local workshop, a caliper, and a good light are enough to catch most problems. The full step-by-step protocol is at the end of this article; the reasoning behind each check follows.
Paperwork first. Match the steel grade and hardness certificate against your purchase order. Then verify the stamped markings on the die itself — model, hole diameter, die width — against your mill’s manual. A surprising number of disputes start with a die shipped for a neighboring machine model.
Dimensions second. Measure effective thickness in three places around the circumference. A die that went through heat treatment badly can come out of the process with distortion; quality makers grind it back to spec afterwards (JIUHE describes post-heat-treatment grinding that brings deformation down to a few hundredths of a millimeter — JIUHE), but a cheap die may not have been ground at all. Uneven thickness means uneven compression around the ring, which shows up as uneven pellet length and localized wear.
Countersinks third. Look at the inlet side under a light. Every hole should show a clean, consistent countersink or counterbore. Missing or half-formed inlets will clog during startup — the most discouraging first hour a new die can give you.
Seating surfaces last. Wipe and inspect the die seating faces and the fixing system — the collar, clamp or wear ring — for burrs or shipping damage. A die that seats unevenly runs unevenly, and the gap setting you carefully tuned will not hold around the full ring. Our spare parts checklist lists the companions that should be inspected at the same time, because a new die on worn roller shells is a new die running on borrowed time.
Operating habits that decide whether the die reaches its life target
The spec sheet gets the die to the mill. Operating habits decide whether it leaves early or on schedule. Four habits carry most of the weight.
Roller gap discipline. The gap between rollers and die inner surface should sit within 0.1-0.5 mm for most applications; too tight and you get metal-to-metal contact that wears both parts, too loose and material slips instead of compressing — low-density, crumbly pellets (Weike). Re-check the gap after every die change and periodically as parts wear. One supplier’s maintenance guide recommends checking weekly and cleaning the die with oil-soaked material after each shift (Changsheng).
Oil-blocking at shutdown. Before stopping, run oil-absorbing material through the die so the holes fill with a protective layer that prevents residual material from hardening and corroding during idle periods (Weike). A die that seizes up between runs is a die that starts its next campaign behind.
Tramp metal control. Stones and metal fragments are the fastest way to turn a smooth bore into a pitted one. Magnets and screens ahead of the mill are cheaper than any die.
Know the retirement criteria in advance. Two published thresholds give you a defensible basis for pulling a die: replace at roughly 15% wall thickness loss measured with weekly caliper checks, or when output drops about 20% below baseline and pellets turn crumbly (Kingwood; Changsheng). Waiting for breakthrough failure means unscheduled downtime and possible roller damage that multiplies the repair bill.
One habit to avoid: closing the roller gap by small increments to chase output. The short-term gain comes with accelerated roller, die and plunger wear — better answers to low output lie upstream in particle size, moisture or compression ratio (TCPEL engineering guide).
When to buy two dies instead of one
Most buyers order one spare die with the machine and never revisit the question. It is worth revisiting, because the right answer depends on your raw material plan, not on the equipment list. If your line runs a single feedstock week after week — a sawmill with steady softwood residue, for example — one working die plus one standby is usually enough. The standby covers the failure you did not schedule, and your wear log tells you when to order the next one.
The calculus changes when the material plan changes. A plant that runs softwood sawdust in the dry season and rice husk or other residue when sawmill supply tightens genuinely needs two different dies, because the compression ratio that suits one material starves or chokes the other. Ordering the second die only when the first switch happens means living through weeks of mismatched compression while a die is drilled, heat-treated and shipped. If a material switch is anywhere in your 12-month plan, price both dies into the original equipment quotation — die suppliers quote better as a pair, and the mill’s drive setup usually handles both without modification.
The same logic applies to diameter. Plants selling into both residential boiler markets and industrial users sometimes keep a 6 mm and an 8 mm die on the shelf and swap according to the order book. Die changes cost a few hours of downtime and some labor, so the economics only work above a certain order size — but when they work, they turn one pellet mill into a product line that serves two markets. Whatever your combination, add every die you intend to run to the same acceptance protocol described below, and store them the way you expect them to behave: oiled, sealed, off the floor, with the certificate taped to the crate.
The RFQ sheet: what to write on the purchase order
Collecting everything above, here is the minimum information a die purchase order should carry. Hand this list to any supplier and the quality of their response tells you as much as the price does.
| Parameter | Why it matters | What to write |
|---|---|---|
| Steel grade + hardness certificate | Decides wear life and corrosion behavior | “X46Cr13, HRC 52-56, vacuum quenched, certificate required” |
| Effective thickness (mm) | Sets the real compression ratio | State millimeters, not just “L/D 6” |
| Hole diameter and pattern | Pellet diameter and open area | “6.0 mm, staggered pattern, state open area %” |
| Counterbore / relief design | Entry resistance and outer-row flow | “Counterbore inlet; state relief arrangement” |
| Bore finish | Friction and pellet release | “Ra ≤ 0.8 μm polished bores” (stainless) |
| Seating dimensions | Fit on your mill model | Mill model + stamped drawing reference |
A die arrival protocol you can run in one hour
Here is the acceptance routine we recommend to buyers, written as an actual checklist. Run it the day the die arrives, while the freight claim window is still open.
1. Match paperwork to purchase order: steel grade, hardness certificate, hole diameter, effective thickness, model reference. Photograph the certificate.
2. Verify the stamped markings on the die body against your mill manual and the order.
3. Measure effective thickness at three points around the circumference with a depth caliper. Spread above your tolerance band means the die was not ground after heat treatment — reject or renegotiate.
4. Spot-check hole diameter with a pin gauge on a sample of holes in three zones (inner, middle, outer rows). Enlarged or oval holes on a new die are disqualifying.
5. Inspect every zone of the inlet face under raking light: countersinks present, uniform, no rolled-over edges.
6. Check the bores of a sample of holes with a bore scope or strong flashlight: uniform polish, no ream marks, no cross-contamination from a previous re-drill.
7. Inspect seating faces, clamp ring and keyway for burrs, nicks or corrosion; stone down small burrs, photograph anything larger.
8. If the supplier claims dynamic balancing or runout tolerances, ask for the test record — or measure runout at installation before final tightening.
9. File the certificate, your measurements and photos with the mill’s maintenance log, next to the roller gap baseline you are about to set. When the die reaches retirement thresholds months later, that record is what turns a replacement decision from an argument into an arithmetic.
Do this consistently and the die stops being the mysterious consumable that fails when it feels like it. It becomes a known quantity with a known life band, a known cost per ton, and a paper trail that protects you in every warranty conversation.